Most people who hate how they look on a webcam are not ugly. They are badly lit. I have watched this play out for eight years of streaming and corporate video work: someone buys a new camera, plugs it in, and the image gets sharper without getting better, because resolution was never the problem. A real webcam lighting setup fixes more faces than any sensor upgrade, and it costs less than a decent microphone.
The second half of the problem is framing and exposure, and both are free. Put the camera at eye level. Get the bright window out of the frame behind you. Put one soft light in front of your face. Do those three things and a plain 1080p camera will beat a flagship sitting in bad light, every single time.
Here is how to do it, which gear actually matters, and the settings that finish the job.
Why you should trust me
I have been on camera for eight years, first on Twitch and now on a weekly podcast that records video, plus corporate shoots where the client's CEO has thirty seconds and no patience. In that time I have owned or borrowed more webcams than I can count, from the Logitech C920 that started all of this to the 4K flagships that cost more than my first car. I have also watched a lot of people blame their camera for a lighting problem.
My bias, stated up front: the sensor is the camera, lighting beats hardware, and autofocus is a feature right up until it hunts in the middle of a sentence. Everything below comes from that position. If you want to argue about 4K marketing, I am here for it.
How I picked and how I tested
Two products made the cut, and both are deliberately unglamorous. My checklist for a camera is short: what the sensor actually does in a normal room, how wide the field of view is, whether the settings stick after a reboot, and whether OBS sees it without a driver fight. Anything that fails that last one is a toy, no matter what the box says.
My checklist for a light is even shorter: color rendering, control over brightness, and how it mounts. A light with bad color rendering makes your skin look gray or orange, and no camera setting rescues it. A light with one brightness level and no diffusion is a flashlight with a clip.
I ran both of these on my own desk, in the same room, with the same OBS scene, and checked the things I actually care about: does the face look like the person, does the background stay where it should, and can I lean in without the exposure swinging around. The rest of this guide is what I would tell a friend who has thirty minutes and a call tomorrow morning.
The two pieces of gear that do the work
You do not need much. One camera and one light, and the light matters more than the camera. If you only buy one thing from this article, buy the light and keep whatever webcam you already own.
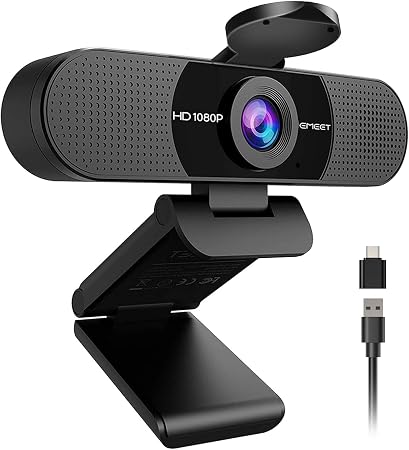
The camera: EMEET C960 1080P Webcam with Microphone, 2 Mics, 90° FOV, Computer Camera
 Visit on Amazon →
The EMEET C960 is a 1080p camera with a 90 degree field of view, and that number is the interesting one. Ninety degrees is the desk-and-chair framing: it covers your shoulders, a bit of the room behind you, and enough of the desk that you can gesture without leaving the frame. Cameras that go much wider turn you into a tiny figure at the bottom of a very large room, which is the opposite of what a talking head video wants.
The two built-in mics are the part I would not lean on. The mic on a webcam is a backup plan, and the camera is the purchase. It will get you through a standup meeting or a call where the alternative is yelling at a laptop lid, and it will not carry a podcast. Treat it that way and you will not be disappointed.
Where this camera earns its place is the mount and the setup. It sits on a monitor or a tripod, it shows up in OBS as a standard UVC camera with no proprietary software to fight, and the image is honest 1080p rather than an upscaled 720p sensor wearing a marketing sticker. For a first camera, a second camera, or the camera on a desk that just needs to work, that is the whole job.
Check current Amazon price before you order, since these move around.
Flaws but not dealbreakers: It is a small sensor, so it wants light. That is not a flaw in this article, it is the reason this article exists. Feed it a soft light in front and it looks dramatically better than it has any right to.
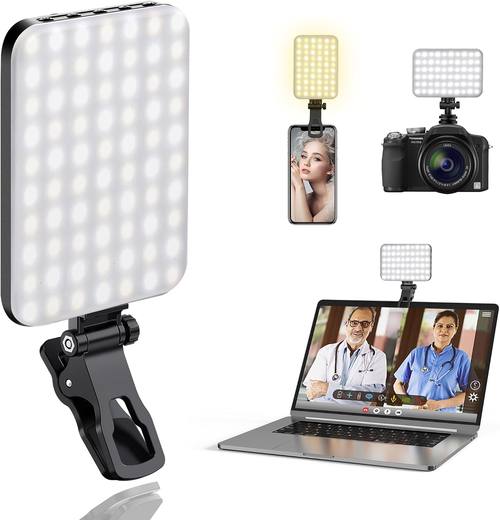
The light: ALTSON 60 LED Portable Selfie Light Video Conference Lighting with Clip & Camera Tripod Adapter Rechargeable 2200mAh CRI 97+, 3 Light Modes for Phone iPhone Webcam Laptop Photo Makeup
 Visit on Amazon →
This is the piece that changes the picture, and the spec that matters is the CRI 97 rating. Color rendering index measures how faithfully a light source shows color compared to daylight. A cheap LED with a low CRI is what makes people look slightly green on camera, or gray, or like they are recovering from something. CRI 97 is close enough to daylight that skin tones come out looking like skin tones, and no white balance slider will fully undo a bad light source.
The 60 LEDs and three light modes give you a usable range from "meeting at 9am" to "interview at noon." The rechargeable 2200mAh battery means you are not hunting for a USB port every session, which matters more than it sounds like it should, because the light you cannot power is the light you stop using.
The mounting is the practical part. It clips onto a laptop lid or a monitor, and it also screws onto a tripod adapter, which is how I would run it. Clipped to a laptop, the light ends up low and close to the screen, and you get a flat, slightly under-lit look. On a small tripod just behind the laptop, angled slightly down at your face, it becomes a proper key light. If you already own a phone tripod, this light probably fits it.
Check current Amazon price before you buy, and consider a second one if you shoot anything with a guest, because two lights at 45 degrees beat one light anywhere.
Flaws but not dealbreakers: It is a small panel, so it is a face light, not a room light. It will not brighten a whole office, and it is not supposed to. Point it at you and it does its job.
The setup, step by step
Thirty minutes, no tools, no software beyond what you already use.
Step one: get the camera to eye level. This is the single most flattering free change you can make. A camera sitting on a laptop base looks up your nose and shows off your ceiling. Stack books, use a monitor arm, or put the camera on a small tripod. If you can look straight into the lens without tilting your chin, you are there.
Step two: kill the backlight. Turn around. If there is a window, a lamp, or a bright doorway behind you, that is your problem. The camera exposes for the brightest thing in the frame, and if that is the window, your face becomes a silhouette. Close the blinds, move the lamp, or move your chair. A plain wall behind you beats a beautiful view every time.
Step three: put the light in front of you. The ALTSON goes slightly off to one side of the camera, roughly at eye level, angled down toward your face. Slightly off axis rather than dead center, because dead center flattens every feature you have. Start at the lowest brightness and step up until your face is clearly lit and the background is not. If you see a hard shadow on the wall behind you, lower the brightness or move the light closer to the lens.
Step four: lock exposure and white balance. If your camera app or OBS lets you set exposure manually, do it. Auto exposure is what makes you brighten and darken every time you move, and it is the reason your skin tone shifts when you wave your hand. Set white balance manually to the closest preset to your room, then leave it alone. If you only have automatic controls, at least keep the light constant so the camera has one thing to lock onto.
Step five: frame yourself. With a 90 degree field of view, sit so your head and shoulders fill the middle of the frame and there is a little space above your head, not a lot. Eyes roughly one third of the way down from the top is the standard. If you are on a 16:9 call grid, keep your face centered horizontally so the crop does not cut you off.
Step six: check it in the app you actually use. OBS, Zoom, Meet, Teams, they all treat the same camera differently. Open the one you will be on and look at the preview, not at yourself in a mirror. Then record thirty seconds, watch it back, and fix the one thing that bothers you most. Nobody gets it perfect on the first pass.
Step seven: deal with audio. The webcam mics are fine for a standup and not much else. If you have a headset or a USB mic, use it. Bad audio makes people forgive nothing, and good audio makes them forgive a slightly soft image.
Settings that make a cheap camera look expensive
Resolution is the last thing to worry about, but these settings matter:
- 1080p at 30 frames per second, not 4K at 15. A clean 1080p feed is better than a stuttering 4K one, and most platforms compress it anyway.
- Turn off low light compensation. It brightens the shadows and washes out your face, and it is the reason webcam footage looks like a security camera at night.
- Turn off noise reduction and sharpening. Both invent detail that is not there. Sharpening adds halos around your hair and glasses, and noise reduction makes skin look like plastic.
- Kill any beauty filter. It smooths your face into a soft blur and eats the detail in your eyes.
- Match your frame rate to your lighting. If you are in a room with LED lights on a dimmer, you may see flicker. Changing the camera to 30fps or 60fps, or moving the light, usually fixes it.
What I skip and why
I skip any camera that claims 4K for a price that should not buy 4K. That is a 1080p sensor with a sticker, and the sticker does not change the physics.
I skip cameras that require proprietary software to change basic settings. If I cannot set exposure and white balance in the app I already stream with, the camera is a toy with a USB cable.
I skip big softboxes and studio strobes for a desk setup. A panel light the size of a phone, mounted properly, does 90 percent of the work for a fraction of the footprint. The remaining 10 percent is for people shooting paid client work, and they already know who they are.
I also skip the DSLR-as-webcam route for anyone who just wants to look decent on a call. It is a rabbit hole of capture cards, dummy batteries, and lens choices, and the person on the other end of the call will not notice the difference between a well-lit webcam and a poorly set up mirrorless camera.
What this all costs
The honest math is that you are buying a light and possibly a camera, and the light is the part that shows up on screen. The camera is a solid 1080p workhorse with a sensible field of view, the light is a high-CRI panel with a clip and a tripod mount, and neither one is a luxury purchase. Check current Amazon price on both before you decide, because the numbers move.
Compare that to the alternative: a flagship webcam that still looks flat because it is pointed at a face lit by a ceiling fixture. The expensive camera in bad light loses. Every time.
Set the camera at eye level, put the light in front, lock your exposure, and stop blaming the hardware. That is the whole job, and your face will thank you on the next call.